Sencha Touch BDD Part 1
April 17, 2013
[behavior-driven-design javascript mobile sencha (tl;dr) A multi-part series of articles on how to test Sencha Touch applications. It uses Jasmine for unit testing and Siesta for integration testing.
Part 1 – Getting Started
In this article you will learn how to set up an application to Jasmine tests in your
Opinionated is a good thing
In my not-so-humble professional opinion, every modern web framework should provide a testing infrastructure with each newly generated application. I’m not concerned if it isn’t my preferred testing package. As long as there’s something. Testing is not an option, and the framework authors probably (hopefully?) test, so why not offer a serving suggestion for new projects? The worst that can happen is that you, the developer, disagree with the choice of framework. There’s a little extra bootstrap cost to replace one framework with another. That’s far less expensive than every new developer discovering a way to test.
Sencha Touch 2.1 has a generator built into its sencha command line tool, but it does not create a test structure as part of the template. This article is the first in a series of discoveries about how to test Sencha Touch applications. I am not claiming that this is the one true way to test. This is not necessarily the best way, either. It is, however, something that works. It installs easily on my development laptop. It gets you to your first passing test quickly. It saves you the cost of exploring all of the options and making these discoveries for yourself. You have plenty of other things to worry about.
But first, you need a web server
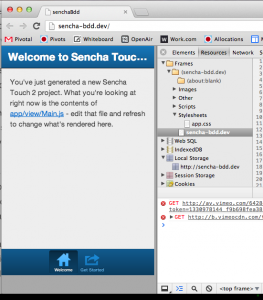
Once you’ve installed Sencha Touch and Sencha Command (3.1.0.256 when I wrote this), and you’ve generated the template application, you’ll need to serve the pages locally. Most projects will have some sort of app server already running, but it’s not strictly necessary for testing. When I need to serve pages on my own, I prefer pow. It is a zero-configuration server that can host as many applications as you please. I also like the powder ruby gem; it adds a nice command line interface to manage pow. If you are worried about adding a ruby dependency to your project, stop worrying. Sencha Touch uses the compass ruby gem to generate css files; so you already have a ruby dependency.
pow looks for a rack app, but in my sample app, I don’t have one. pow also looks for a directory named public from which it will server static files. The simplest thing that works is to create a symlink named public that points to the root directory of the project.
# Generate a new ST app
$ cd <touch toolkit directory>
$ sencha generate app senchaBdd ~/workspace/sencha-bdd

# Set up pow/powder
$ cd ~/workspace/sencha-bdd
$ ln -s . public
$ powder up
$ powder link

# Test the server
$ open http://sencha-bdd.dev
If all goes well, you should be able to open the application in any web browser at http://sencha-bdd.dev
Install Jasmine
Installing the stand-alone version of Jasmine will work, but it doesn’t scale to hundreds or thousands of specs. That’s why the Jasmine gem was created. I did some more research and found a way to test using the Jasmine gem.
- In the root directory of your project add
rakeandjasmineto yourGemfile$ cat Gemfile source "https://rubygems.org" group :development do gem 'rake' gem 'jasmine' end -
Run
bundle install -
Run
jasmine init - Jasmine will install a basic set up, but there’s some cruft that you won’t need for a Sencha application.
rm public/javascripts/Player.js rm public/javascripts/Song.js rm spec/javascripts/PlayerSpec.js - Edit the src_files entry in
spec/javascripts/support/jasmine.yml:src_files: - touch/sencha-touch-all-debug.js # Load Sencha library - spec/app.js # Load our spec Ext.Application - app/**/*.js # Load source files - Create this file in
spec/app.js:Ext.Loader.setConfig({ enabled: true, // Turn on Ext.Loader disableCaching: false // Turn OFF cache BUSTING }); Ext.Loader.setPath({ 'SenchaBdd': 'app' // Set the path for all SenchaBdd.* classes }); Ext.application({ name: 'SenchaBdd' // Create (but don't launch) an application }); - And this one in
spec/javascripts/helpers/SpecHelper.js:Ext.require('Ext.data.Model'); afterEach(function () { Ext.data.Model.cache = {}; // Clear any cached models }); var domEl; beforeEach(function () { // Reset the div with a new one. domEl = document.createElement('div'); domEl.setAttribute('id', 'jasmine_content'); var oldEl = document.getElementById('jasmine_content'); oldEl.parentNode.replaceChild(domEl, oldEl); }); afterEach(function () { // Make the test runner look pretty domEl.setAttribute('style', 'display:none;'); });
So, what’s going on here? Sencha Touch applications need Ext.Loader to manage class loading. You also need an Ext.Application, especially for controller tests. The modifications to jasmine.yml set up the proper load order, and the jasmine gem will find all of the source files underneath the app/ directory. The app.js is a customized version of your normal app.js that sets up the class loader and global namespace configuration. You should replace “SenchaBdd” with the real name of your application. Two things are happening in SpecHelper.js: First, by default Ext.data.Model caches every model created by the application in a global in-memory array. If you don’t clear it between tests, you can be surprised by test pollution. The second part is to set up and clear a space in the test runner for inserting DOM elements, usually for some sort of view testing.
Create a directory structure that matches your application’s
Your application’s directory structure should look something like this:
├── app
│   ├── controller
│   ├── model
│   ├── profile
│   ├── store
│   └── view
Modify the spec directory so that it mirrors the app/ directory:
├── spec
│   ├── app.js
│   └── javascripts
│       ├── model
│       ├── controller
│       ├── view
│       ├── store
│       ├── profile
Install Jasmine
You can get the stand alone version from http://github.com/pivotal/jasmine. Install it at the in the spec directory. I include the version number, so I can experiment with different versions, but that’s a matter of taste.
├── app
│   ├── controller
│   ├── model
│   ├── profile
│   ├── store
│   └── view
├── public -> .
├── resources/
├── spec/
│   ├── controller
│   ├── jasmine-1.3.1
│   ├── model
│   ├── profile
│   ├── store
│   └── view
└── touch
In order to get Jasmine going, you need a special html file named, by convention, SpecRunner. Add it to spec/ as well. It looks like this:
You will need to modify lines 18 and 22 with the name of your ST app (which can be found in app.json and app.js).
Write one passing test
Create a file, spec/javascripts/sanitySpec.js
describe("Sanity", function() {
  it("succeeds", function() {
    expect(true).toEqual(true);
  });
});
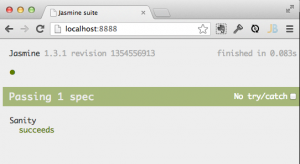
Now load the spec runner into a browser. In the case of this sample app, the url is http://sencha-bdd.dev/spec/SpecRunner.html
Now start the Jasmine spec server from the command line:
bundle exec rake jasmineAnd then open a browser window on http://localhost:8888
You should see the test results with one passing spec.
If you don’t see this, open up the browser’s developer console to look for clues.
Until next time
That’s it! You now have a complete JavaScript testing framework installed in your application. This is a good time to commit your changes. Celebrate in the glory of the green goodness. You’ve earned it.
Next time, I’ll show you how to test a model class.